The
HW prerequisites
The El-Cheapo
V 0.1.0, 28.12.2004
Timo Sivula
This howto explains how a user can combine 2 or more consumer grade soundcards of the same model to be used as one single virtual multichannel soundcard for multichannel recording in Linux.
The steps involved are:
a) perform a simple hardware modification to the cards
b)
configure ALSA and Jack to work with the virtual multichannel card
This HOWTO explains how to perform steps a) and b).
This HOWTO is targeted at the Linux audio user who wants to record 4 or more channels simultaneously but does not want to invest the big bucks to buy a real multichannel card.
The challenge in recording with more than one soundcard at once in any computer under any operating system is to make the cards syncronize. The actual sample rate of each card is depending on the crystal used in the card. To cut the component cost of consumer grade soundcards cheap crystals, with wider tolerances than those used in pro equipment, are often used. As a result, when using two cards at once one can have a real sample rate of 44.099 kHz in one card and a samplerate of 44.101 kHz in the other. This is no problem when recording with one card only, but the difference in the sample rates will cause phase shifts in the recording when using two cards. Phase shifts make the high frequencies of the recording e.g. cymbals sound bad. Further, not all audio drivers can drive cards that are not in exact samplerate sync.
Some pro-cards come equipped with a link to connect multiple cards to run in sync. Consumer cards do not have this feature. This Howto describes a simple hardware modification to create such a synchronisation link between consumer grade cards. Without hardware modifications it is very difficult to ensure the cards are in sync.
The objective of this HOWTO is to help the budget constrained studio engineer wannabe to create an affordable 8 channel Digital Audio Workstation DAW out of multiple consumer grade soundcards.
To complete the tasks at hand it is required that the user has a working installation of the Advanced Linux Sound Architecture ALSA. Familiarity with Linux audio tools such as Jack and Ardour is necessary in order to test the system. The easiest way to fulfill the software prerequisites is to install the Planet CCRMA package of audio environment from http://ccrma.stanford.edu/planetccrma/software/ My system is running a Celeron 2G, with 1GB memory and Fedora Core 1 with Planet CCRMA.
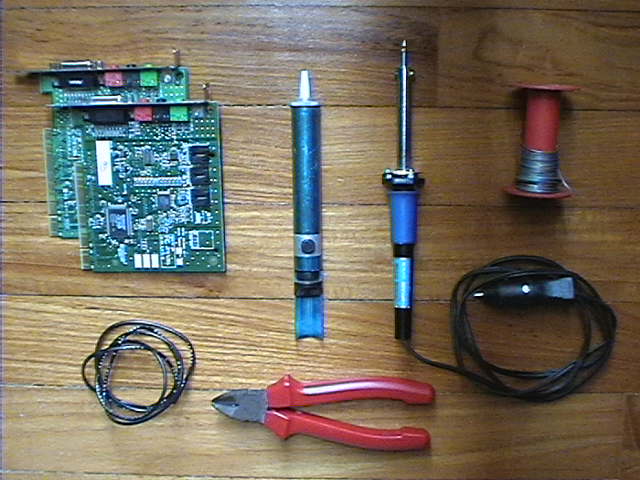
You need two or more soundcards of the same model and some tools. You also need a soldering iron designed for electronics work to perform the hardware modification. An iron designed for copper welding will kill your card, so invest the few bucks on a basic soldering iron. In addition you need about 50 cm of thin coaxial cable and tools to cut the cable. In the picture below you can see from the top left: 2 Ensoniq AudioPCI cards, a solder vacum, a 12V soldering iron, solder lead. On the bottomline there is some thin coaxial cable of the model RG174U and a cable cutting tool. Further, a basic level of experience in using a soldering iron and the vacum is needed to perform the hardware modifications explained.
The
HW prerequisites
Also consumer grade cards can be made to run in samplerate sync. This can be achieved by driving all cards from one common crystal and disabling all other crystals. Even if the master crystal is a cheap crystal with a wide tolerance and the actual sample rate is 44.090 kHz instead of the nominal 44.100 kHz, all cards will run at the same sample rate. There will be no phase shifts in the recording and ALSA and Jack accept the cards for virtual multichannel recording. The following sections will describe how to ensure the cards run in sync and how to configure ALSA and Jack to run the virtual multichannel card.
The writer of this document takes no responsibility for the results of the modification described below.
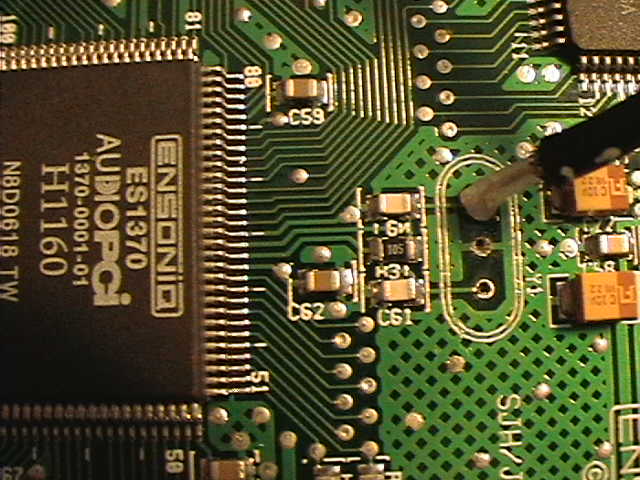
In the picture below an unmodified Ensoniq AudioPCI card is shown, but the same method should be OK for virtually all cards.
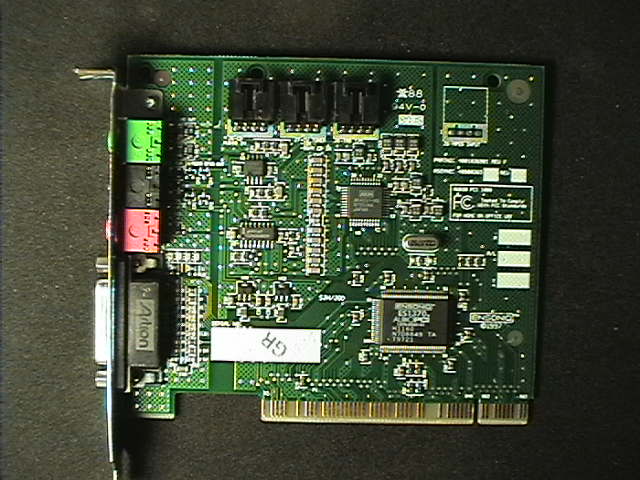
The
unmodified ES1370 card
For the modification to work, all cards have to be of the same make and model. Different cards use different crystals, and trying to sync two cards with different crystals will fail. The crystal is usually packaged in a metal enclosure, it is about 10-15 mm wide, 7-12 mm high and 2-3 mm thick. You can locate it in the neighborhood of one of the big integrated circuits on your board. When you turn the card, you should find 2 or 3 legs coming out from the crystal on the other side. Before starting the modification, double check from the crystal casing that all cards indeed use the same frequency on the crystal.

The
crystal here is the component marked ”C22.5792”
Once identified, remove the crystals from all but one of the cards you intend to sync. Use a low wattage soldering iron not to damage your card.
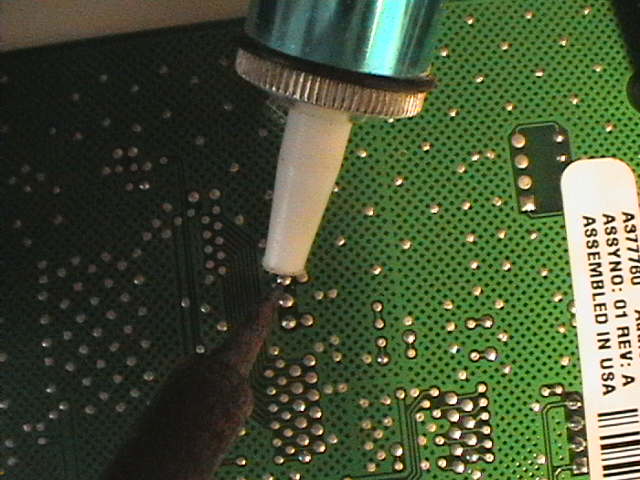
The
crystal is being removed. Solder vacum on top, soldering iron below.

The
slave card with the crystal removed
If the crystal has three legs the middle leg is
connected to the casing and also the card's ground a.k.a earth. The
two outer legs are the actual crystal connectors.
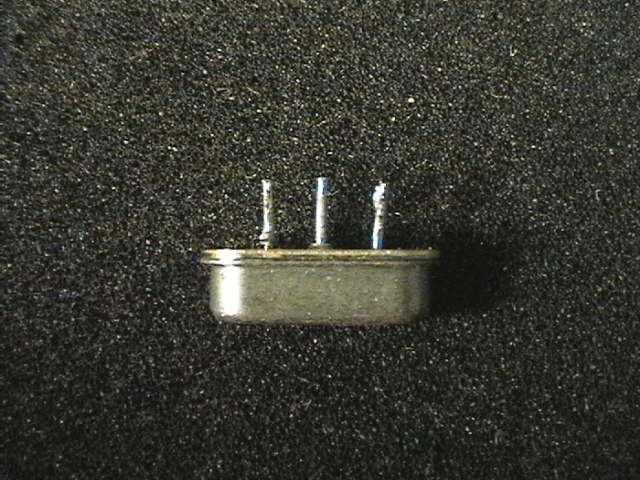
The
removed crystal
The next thing to do is to create a cable
to connect the cards. RG 174 U is probably a bit overkill for this
purpose, but at least it works. With the cable we will make the slave
card, i.e. the card with no crystal use the master card's crystal.
Reveal about 1 cm of the end of the cable.

1.
Be careful not to cut the cable!

2.
Only remove the plastic cover

3.
Split the center and the shield.
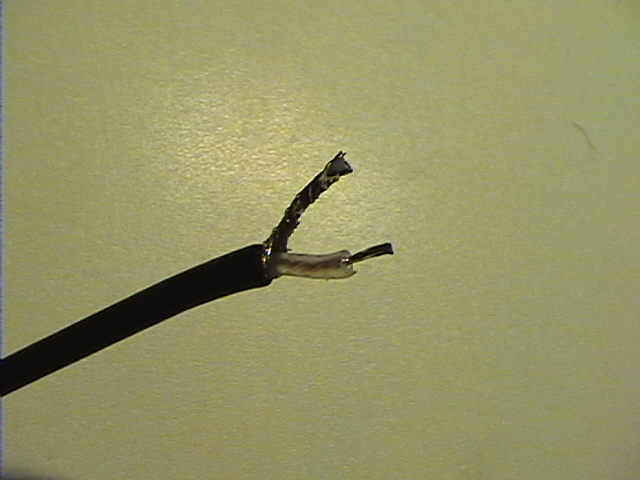
4.
Solder them solid.

5.
The shield is not used in the other end
As a result you should have a 10 cm long
piece of cable that has the shield connectable in one end only. You
need one cable for each slave card you want to add to your system.

The
cable ready to be connected.
In the AudioPCI card seen from the ES1370 IC the left crystal leg is crystal IN and the right leg is crystal OUT. Once you have removed the crystals from all but one card, connect the cards in chain after the card that still has a crystal: solder the centre wire of the coaxial cable to the right leg of the crystal on the master board and connect the other end of the cable to left hole of the first slave card. Be careful to only connect the cable shield to the card ground at one end and leave the other end ground open, i.e. the shield not connected anywhere. This way you will avoid earth loops.
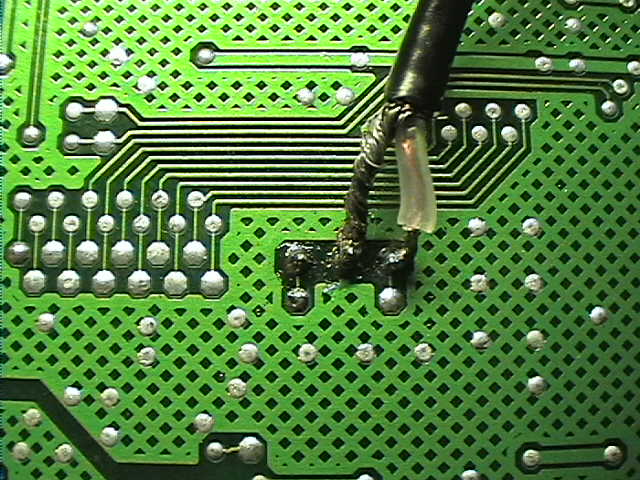
On
the master card the cable is connected to crystal pins on the
opposite side of the card
On
the slave card only the center wire is connected.
In the two pictures above you can see how
the cable is connected. If you want to connect more cards, you can
chain them after the first slave card by connecting the next cable to
the free hole in the previous slave card.
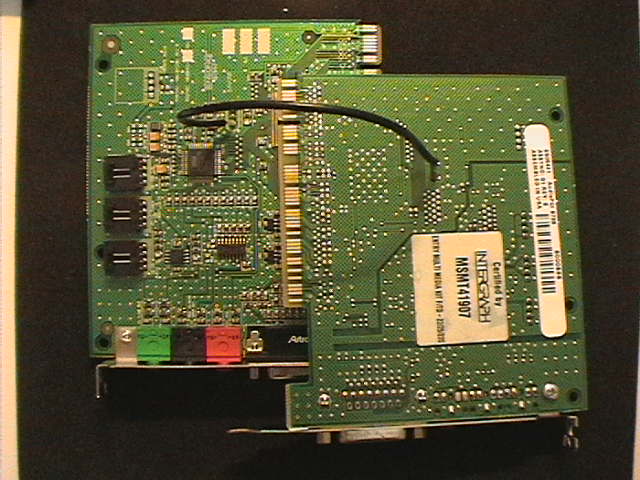
The
two cards, slave to the left, master to the right.
Test the system first with two cards using
for example aplay. If only the master card with the crystal intact
works and the slave not, reverse the connection of the cable from
left to right crystal leg on the master and right to left on the
slave. Once both cards work you can chain the rest of the cards after
each other.
The modification has been tested and verified using three Ensoniq AudioPCI cards. It should work on any type of card. Please report success or failure on other makes of cards on the linux audio user list.
ALSA has to be configured to recognize more than one card. Follow the advice on the Planet CCRMA homepage for setting up your /etc/modules.conf or /etc/modprobe.conf: http://ccrma.stanford.edu/planetccrma/software/installkernelandsound.html#SECTION00023400000000000000
Here is my /etc/modules.conf. I have three ES1370 cards that are synced and the motherboard integrated chipset defined.
# --- ALSA configuration
alias char-major-116 snd
alias char-major-14 soundcore

# Inbuilt card
#-- OSS compatibility alias
alias sound-slot-0 snd-card-0
alias sound-service-0-0 snd-mixer-oss
alias sound-service-0-1 snd-seq-oss
alias sound-service-0-3 snd-pcm-oss
alias sound-service-0-8 snd-seq-oss
alias sound-service-0-12 snd-pcm-oss
# 1st card
#-- OSS compatibility alias
alias sound-slot-1 snd-card-1
alias sound-service-1-0 snd-mixer-oss
alias sound-service-1-3 snd-pcm-oss
alias sound-service-1-12 snd-pcm-oss
# 2nd card
#-- OSS compatibility alias
alias sound-slot-2 snd-card-2
alias sound-service-2-0 snd-mixer-oss
alias sound-service-2-3 snd-pcm-oss
alias sound-service-2-12 snd-pcm-oss
# 3rd card
#-- OSS compatibility alias
alias sound-slot-3 snd-card-3
alias sound-service-3-0 snd-mixer-oss
alias sound-service-3-3 snd-pcm-oss
alias sound-service-3-12 snd-pcm-oss
#-- Soundslot aliases
alias snd-card-0 snd-ens1370
options snd-ens1370 enable=1,1,1
alias snd-card-1 snd-ens1370
alias snd-card-2 snd-ens1370
alias snd-card-3 snd-via82xx
#-- Options
options snd major=116 cards_limit=4 device_mode=0666 device_gid=0 device_uid=0
# -- Keep modules from being autocleaned
add options -k snd-card-0
add options -k snd-card-1
add options -k snd-card-2
add options -k snd-card-3
#--- ALSA configuration END
Alsa has to be configured to use the cards as one virtual multichannel card, otherwise you can only use one card at a time. I do not understand how this works, but it is easy to figure out how to add more cards to the virtual card. Here is my ~/.asoundrc. It first defines a virtual card called multi4 that only uses two cards. After that comes the definition for multi6 that uses 3 cards to enable 6 simultaneous channels.
pcm.mt4 {
     type multi
     slaves.a.pcm "hw:0,0";
     slaves.a.channels 2;
     slaves.b.pcm "hw:1,0";
     slaves.b.channels 2;

     bindings.0.slave a;
     bindings.0.channel 0;
     bindings.1.slave a;
     bindings.1.channel 1;
     bindings.2.slave b;
     bindings.2.channel 0;
     bindings.3.slave b;
     bindings.3.channel 1;
}

ctl.mt4 {
     type hw
     card 0
}

pcm.multi4 {
     type route;
     slave.pcm "mt4";
     ttable.0.0 1;
     ttable.1.1 1;
     ttable.2.2 1;
     ttable.3.3 1;
}

ctl.multi4 {
     type hw;
     card 0;
}


pcm.mt6 {
     type multi

     slaves.a.pcm "hw:0,0";
     slaves.a.channels 2;

     slaves.b.pcm "hw:1,0";
     slaves.b.channels 2;

     slaves.c.pcm "hw:2,0";
     slaves.c.channels 2;

     bindings.0.slave a;
     bindings.0.channel 0;

     bindings.1.slave a;
     bindings.1.channel 1;

     bindings.2.slave b;
     bindings.2.channel 0;

     bindings.3.slave b;
     bindings.3.channel 1;

     bindings.4.slave c;
     bindings.4.channel 0;

     bindings.5.slave c;
     bindings.5.channel 1;
}
ctl.mt6 {
     type hw
     card 0
}
pcm.multi6 {
     type route;
     slave.pcm "mt6";
     ttable.0.0 1;
     ttable.1.1 1;
     ttable.2.2 1;
     ttable.3.3 1;
     ttable.4.4 1;
     ttable.5.5 1;
}
ctl.multi6 {
     type hw;
     card 0;
}Qjackctl is not good with the multichannel device, but causes a lot of xruns. Therefore when you start the multichannel device use jackstart in a terminal, not using Qjacktl. Jack does still not always start without problems when using the multi virtual cards. If you get an error message like...
jackstart: pcm.c:5957: snd_pcm_mmap_commit: Assertion `frames <= snd_pcm_mmap_avail(pcm)' failed.
... press ctrl-c and try again. My system requires sometimes 4-5 retries before the multichannel device agrees to run. Sometimes it refuses to start the multi device at all, and will start only after a cold reboot of the PC. Once jack gets started, it seems to run forever without xruns. Depending on your card you may also be successful with lower latencies than in the examples below.
Of some reason jack is not happy with more than 2 simultaneous outputs when using the multi devices but churns out a strange error message:
$ jackstart -R -d alsa -d multi6 -r 44100 -n 3 -p 128 -S
back from read, ret = 1 errno ==
Success
jackd 0.99.0
Copyright 2001-2003 Paul Davis and
others.
jackd comes with ABSOLUTELY NO WARRANTY
This is free
software, and you are welcome to redistribute it
under certain
conditions; see the file COPYING for details
loading driver ..
apparent rate =
44100
creating alsa driver ...
multi6|multi6|128|3|44100|0|0|nomon|swmeter|-|16bit
configuring
for 44100Hz, period = 128 frames, buffer = 3 periods
ALSA lib
pcm.c:1178:(snd_pcm_link) SNDRV_PCM_IOCTL_LINK failed: Operation
already in progress
Despite the error message above the virtual card still works great, and seem to be very stable. I have been able to record over 10 hours continuously with this. It is also nice to have 6 outputs, it gives some freedom on where to assign the click and monitor channels. You may want to try different values for -n and -p to find your best settings.
As I only have one stereo amplifier, I am mostly happy with 2 outputs, and this also makes it possible to start El-cheapo without any Jack error messages. For 6 channel recording 2 channel playback:
$ jackstart -R -d alsa -C multi6 -P hw:0 -r 44100 -n 3 -p 2048 -S -i 6 -o 2
For 4 channel recording 2 channel playback:
$ jackstart -R -d alsa -C multi4 -P hw:0 -r 44100 -n 3 -p 2048 -S -i 4 -o 2
This Howto has explained how two or more consumer grade soundcards can be linked together to produce a virtual multichannel soundcard for recording using ALSA and Jack under the Linux operating system.
To be written
To be written
To Fernando Lopez-Lezcano for Planet CCRMA at home
To all on the various linux audio related lists for the help with configuring the alsa multi device
Mikko Helin and the gurus on sfnet.harrastus.elektroniikka for the HW mod.